Stream Deck for Ham Radio — Part 3: Rotator Control

One of the more satisfying parts of this whole project was getting rotator control working directly from the Stream Deck. Before this, pointing the beam meant switching to PSTRotatorAz, clicking a bearing, and waiting. Now I press one button and the rotator starts moving. For DX region presets, I press the Europe button and the beam swings to 50 degrees automatically — no manual entry required.

This post covers Part 3 of the Stream Deck series — controlling a Yaesu antenna rotator directly from the Stream Deck using PowerShell scripts that send UDP commands to PSTRotatorAz.

Stream Deck rotator control page showing compass direction buttons, DX region presets, stop button, and bearing query button
The rotator control page — compass directions across the top two rows, DX region presets along the bottom, with Stop and Bearing query buttons in the center.

How It Works

PSTRotatorAz supports remote control via UDP on port 12000. A PowerShell script can send an azimuth command directly to the running software using a simple XML-formatted UDP packet — no third-party plugin required, just PowerShell’s built-in networking. The command format is straightforward:

<PST><AZIMUTH>270</AZIMUTH></PST>

That’s it. PSTRotatorAz receives the packet and starts rotating to the specified bearing. The script validates the azimuth value (0–360), sends the command, confirms it in the console, and exits. The whole thing runs in under a second.

Enabling UDP Control in PSTRotatorAz

Before the scripts will work, UDP control needs to be enabled in PSTRotatorAz:

  • Open PSTRotatorAz
  • Go to Communication → UDP Control → Enable
  • Set the port to 12000 (default)
  • Click OK and confirm the UDP indicator is active

To verify the port is available before enabling: open a PowerShell window and run netstat -ano | findstr ":12000" — no output means the port is free.

The Two Scripts

RotatorAzimuth.ps1 is the workhorse. It accepts a single -az argument and sends the corresponding azimuth command to PSTRotatorAz. Every compass direction button and every DX region preset calls the same script with a different azimuth value:

-ExecutionPolicy Bypass -File "C:\Ham Scripts\RotatorAzimuth.ps1" -az 50

RotatorStop.ps1 sends an immediate stop command to PSTRotatorAz, halting rotation wherever the antenna currently is. This is useful if you press the wrong direction button or want to stop mid-swing.

Both scripts are available for download in the project’s GitHub repository: github.com/N4MI73/streamdeck-hamradio

Button Layout

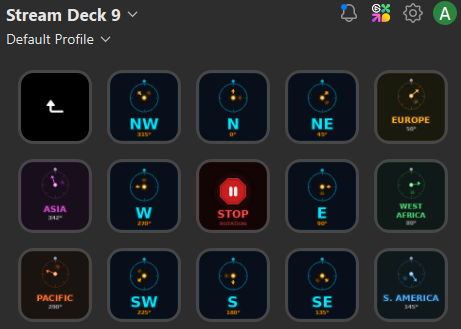
The rotator control page is organized as a folder within the main Stream Deck layout — pressing the Rotator Control button on the main page opens this dedicated page with an automatic back button in the top left corner.

The layout is arranged in three rows:

  • Row 1 — Back button, NW (315°), N (0°), NE (45°), Europe (50°)
  • Row 2 — Asia (342°), W (270°), STOP, E (90°), West Africa (80°)
  • Row 3 — Pacific (290°), SW (225°), S (180°), SE (135°), S. America (145°)

The compass directions are arranged spatially so they mirror an actual compass rose — N at the top center, S at the bottom center, and the intercardinal points in their correct positions. The DX region presets are placed on the outer edges next to the compass direction they’re closest to, making it intuitive to find the right button at a glance.

DX Region Presets

The five DX region buttons use approximate great-circle headings from my grid square EM83 in central Georgia:

  • Europe — 50°
  • West Africa — 80°
  • S. America — 145°
  • Pacific — 290°
  • Asia — 342°

These are starting points rather than exact headings — propagation paths vary by band and conditions. For a quick DX pileup, pressing Europe and being within a few degrees is close enough. For precision work, PSTRotatorAz’s built-in DXCC lookup or an online great-circle calculator will give you the exact bearing. Operators in other grid squares should calculate their own headings and update the -az values in their Stream Deck button configurations accordingly.

The Custom Icons

Each rotator button has a custom icon showing a compass rose with the beam arrow pointing in the correct direction, color coded by type — cyan/blue for compass directions, earth-tone colors for DX regions, and red for the Stop button. At a glance I can tell exactly where each button will point the beam without reading the label. The Bearing button shows a compass with a query indicator — pressing it displays the current azimuth reported by PSTRotatorAz.

The next and final post in this series covers how the custom icons were created, a getting started guide for operators who want to build their own setup from scratch, and some closing thoughts on how this project evolved over time.

Tower Flyover Video

Just for fun, I took drone footage showing the view from the top of the tower. To get the video, I used a DJI Mini 4K drone, and did some light editing in Microsoft Clipchamp. I am still learning to fly the drone and edit videos. This is a first attempt, and hopefully I will get better with more experience.

N4MI Tower Flyover, June 1, 2025

Completed My Station Upgrades!

It has been a long journey, but I have finally completed all of the station updates that were started over a year ago. Several of my ham friends came over to pull coaxial cables through conduit, connect coax to the entry panel, and align the rotator. I had some additional work inside the shack to set up a new amplifier and computer. After double-checking every connection and configuration, everything is working great and I am very happy with my (mostly) new station!

Outside I have a U.S. Tower MA-40 tower with Yaesu G-800DXA rotator turning a K4KIO hexbeam antenna with elements for 20-6M. I also have a MyAntennas 80-10M end-fed halfwave antenna, and a discone antenna for my scanner. These are all fed through underground conduit to a KF7P entry panel with Morgan Systems lightning arrestors for the coaxial and rotator cables.

Inside the shack, my station consists of a Icom IC-7610 transceiver and SPE Expert 1.5K-FA Taurus amplifier for HF. For CW, I use a UR5CDX paddle with a WinKeyer USB and MRP40 decoder software. For digital, I primarily use WSJT-X, but sometimes dabble in RTTY and other digital modes. I have a ERC Mini DX as a USB interface with the Yaesu control box, along with PstRotatorAZ software.

For VHF and UHF I have an Icom IC-97oo, as well as an Alinco DR-06TA for use on the local 6M repeater. I use a Uniden SDS-200 scanner to monitor various communication in the local area.

I also updated the TV I had over my station with a 43″ 4K Smart TV. It has 4 HDMI inputs so I can switch between displaying GeoChron and HamClock, or as a third monitor for the computer. I upgraded my trusty Windows 10 shack computer with a new Windows 11 computer. I have Raspberry Pi touchscreen display running WeatherFlow PiConsole software to display weather data from a WeatherFlow Tempest station. I have two MMDVMs, an OpenSpot 4 Pro and a TGIFSPOT 3.5 inch Nextion. Finally, there is a Google Nest Hub that I use as a photo frame and for streaming music and monitoring security cameras.

I am looking forward to many years of good DXing!

Raising the Tower

I have not posted any updates for a long time. Since my last post, the new tower has been raised. There is still some work to do. Mainly, running the cable and installing an entry panel. There was steady progress until hurricane Helene came through our area at the end of August. Here are some pictures of the construction and the finished tower. Most of the construction took place during the Summer of 2024.

It all starts with digging a hole. This one is 5 feet deep by 3 feet wide.

After the hole was dug, the rebar cage went in.

The forms for the concrete base were then added. I also added some trenches to lay conduit for coax. I have a wire antenna on the mast at the fence. The conduit will route that coax to the tower, then coax from all antennas will come from the tower to an entry panel at the shack.

The concrete for the foundation was poured, and after a few days of curing, the tilt base and tower were bolted onto the foundation.

Then the rotator and a tilt plate for the hexbeam were installed onto the tower.

Several friends came over for an antenna party to build the hexbeam.

After it was built, we tested the SWR and it was excellent on all bands, 20M to 6M.

A few days later, the hexbeam was attached to the rotator, and the tower and antenna were raised.

I mentioned that hurricane Helene introduced some delays in finishing the project. I had the tower fully lowered. The hurricane force winds came from the south, and the tower is on the north side of the house, so the tower and hexbeam were not damage. The biggest holdup is that the winds bent the mast and the eave mount for my VHF/UHF vertical on the roof of my house. The vertical is now hanging over too far for me to fully raise the tower. I need to get a lift to either remove or repair the vertical mount.

I also still need to install the entry panel, which will involve drilling through the wall to route the coax from the panel into the shack. I hope to get those things done in the next few weeks.

The Tower Finally Arrived!

I recently purchased a U.S. Tower MA40 crank-up tubular tower. The ordering process through the Ham Radio Outlet store in Atlanta was fairly easy and straightforward. I was told there could be a 20+ week lead time when I ordered it, but it arrived earlier than expected. If you are considering buying a new tower, be sure to include the cost of freight in your expense calculations. The cost of freight from California to Georgia was close to a third of the price of the tower itself.

This is a relatively small free-standing tower at 40 ft high, and it’s really more of a super heavy-duty mast. It can be cranked down to 21 ft in the event of high winds or bad weather. I also bought the MAB-40 tilt-over base, which will allow the tower to be completely lowered for very bad conditions or to perform maintenance on the antenna or rotator.

I will be using a K4KIO hexbeam antenna with elements for 20M through 6M, and a Yaesu G-1000DXA rotator. I also need to start work on an entry panel with lightning protection for the coax and rotator cables. I will also route the cables for my existing wire antennas through the entry panel, and leave room for a few more.

I am very excited about the significant improvement the tower and antenna will make to my station. It will take some time to get the tower installed. The town I live in requires a Conditional Use Permit to install any type of tower on residential property. It definitely pays to learn about the municipal codes in your jurisdiction when planning to install a tower. I received some excellent advice through the ARRL Volunteer Counsel program. Fortunately, the Planning Department is supportive and giving me a lot of help to prepare the application, but the soonest it can be presented to the Board of Zoning Appeals is June.

For now, the tower is resting peacefully on the ground at the side of my house. There’s lots of work still to do, but I am getting closer to my dream of adding a directional antenna to the shack! More to follow as this project progresses.