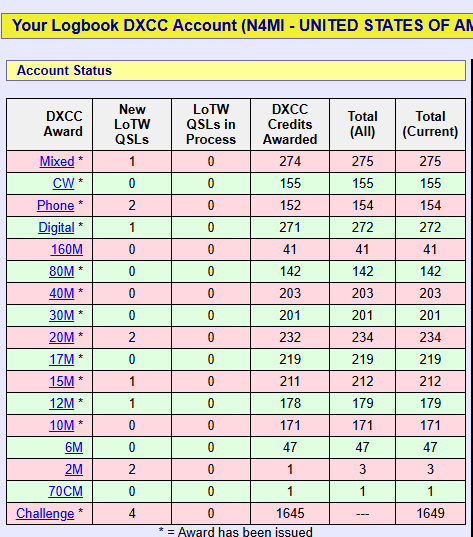
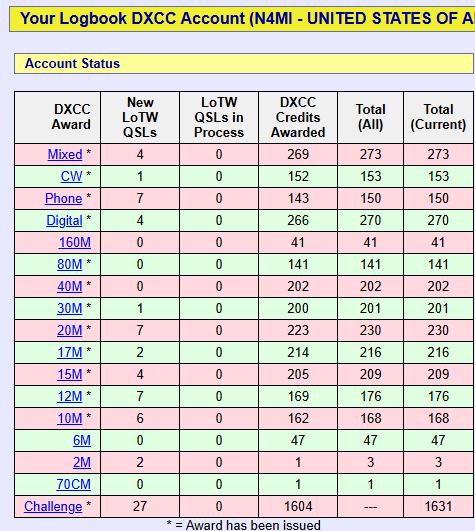
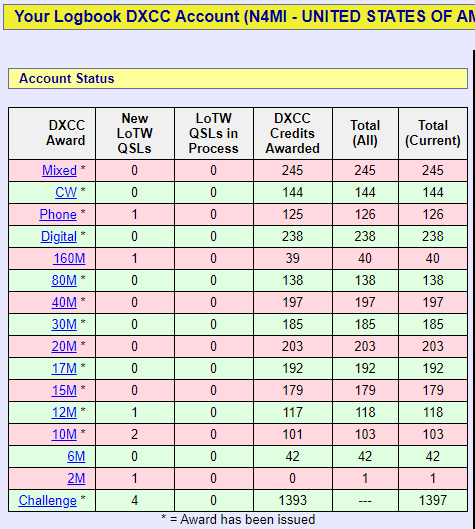
This week I finally achieved a DXCC milestone I have been chasing for several years. I finally got 275 countries confirmed in LoTW. When I reached 25o a few years ago, I figured that I would not go much higher. The station upgrades are paying off. I have been mostly focused on making SSB and CW contacts, but will certainly still work FT8 for ATNOs and band-slot fillers!
As all DXCC award chasers know, once you reach 200 the ATNOs become more difficult and less frequent. This makes each one more exciting and meaningful. With the current solar cycle on the decline, I don’t know whether I will reach 300 or higher, but I will certainly keep trying!
I have continued to work on this app. This was a labor of love, really, to help me in my pursuit of ATNOs and band/slots for DXCC awards and endorsements. I have shared it in several venues hoping that other hams with similar pursuits would find it helpful. I have also received some excellent feedback to add features and improvements.
I’ve been reading a lot about vibe-coding, and thought I would give it a try. I have been off-and-on trying to learn Python. Maybe someday I will get it.
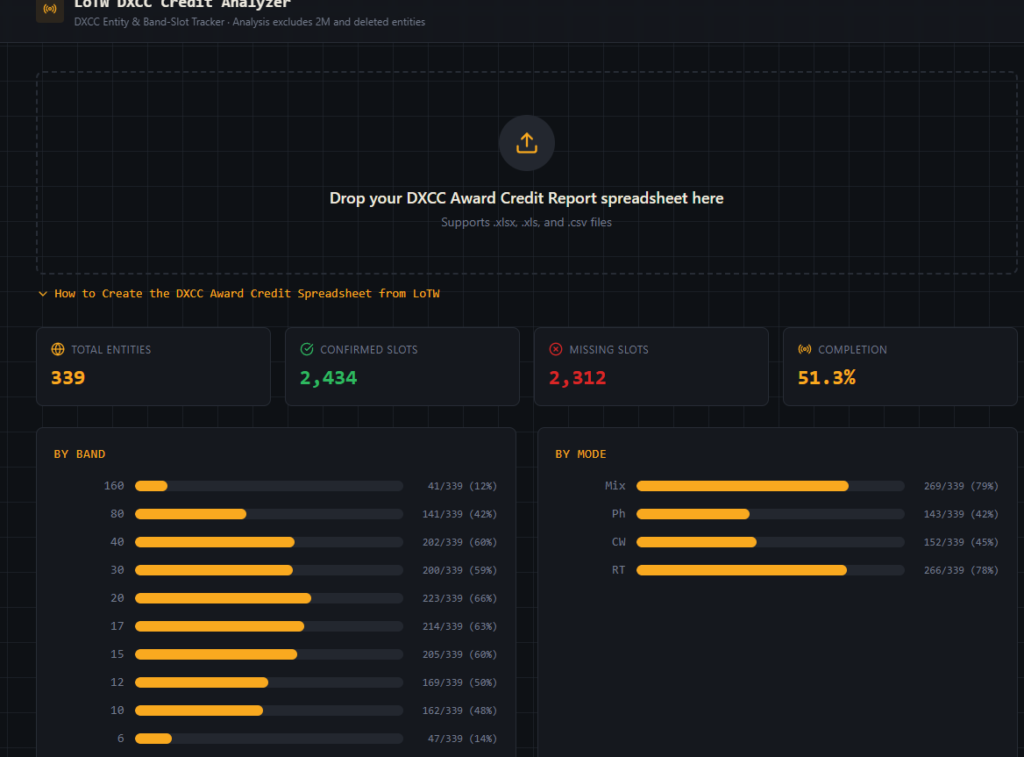
I have always wanted an app that would perform analysis of the DXCC Award Credit Matrix from Logbook of the World. There is no option to download the table as a spreadsheet. So, I thought I would try to cook something up myself using AI coding.
I used Lovable, which is an AI-powered, no-code app builder designed to create web applications and websites from simple text prompts. It enables users to rapidly build functional, production-ready apps—such as project management tools, calculators, or landing pages—by generating code and UI through conversational AI.
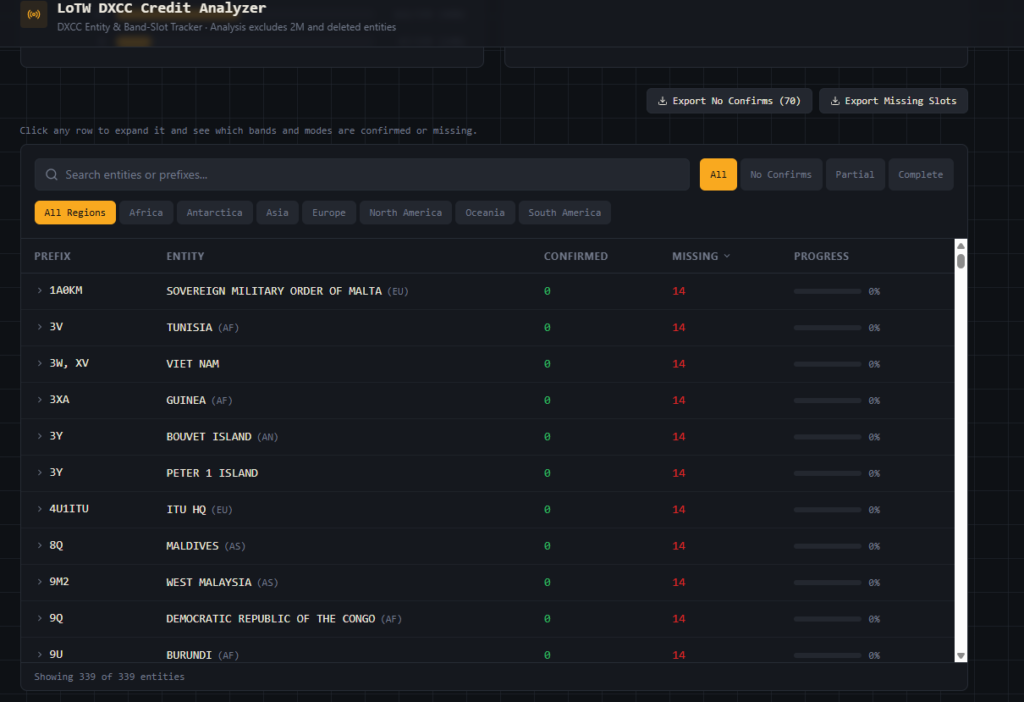
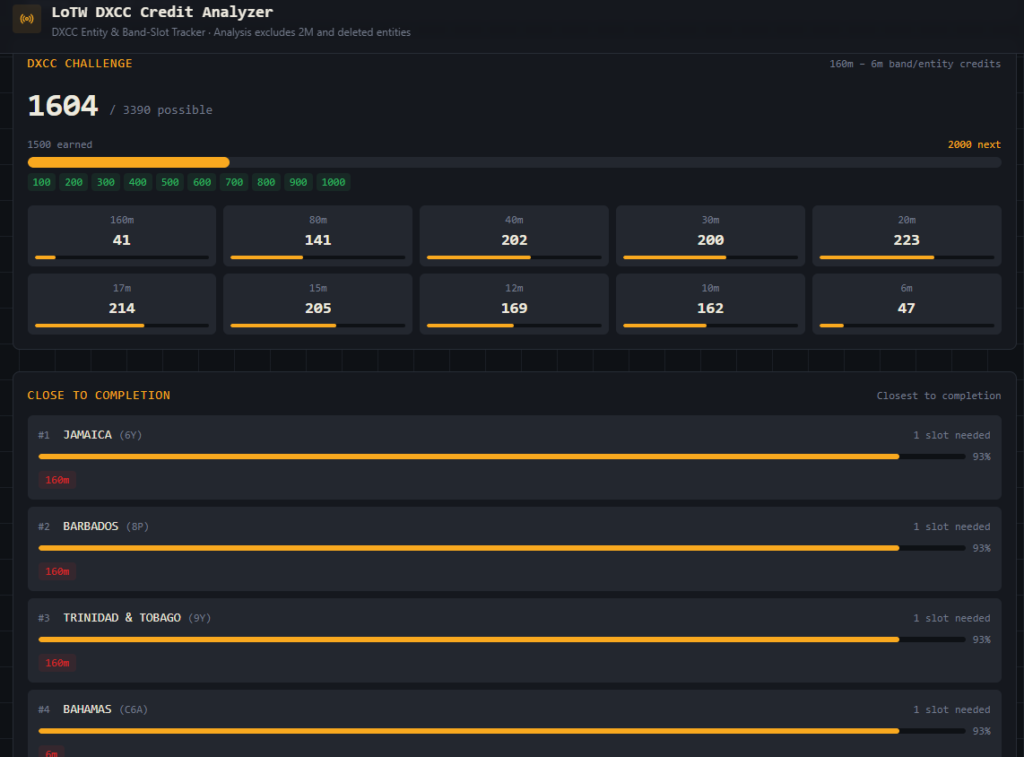
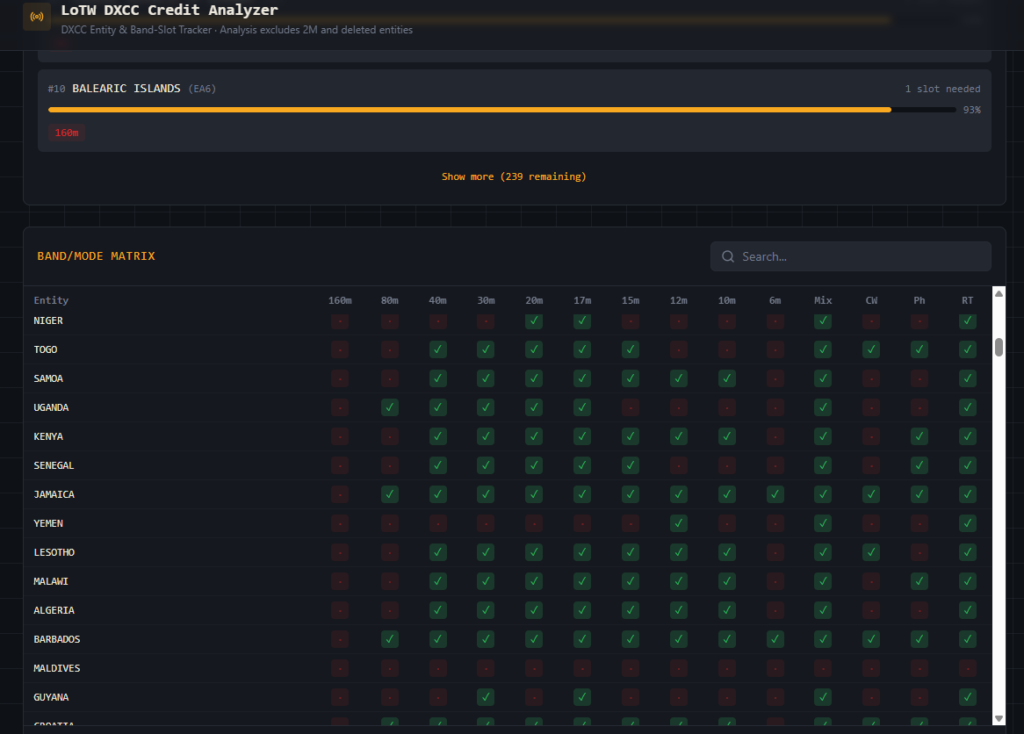
I create a web app called “LoTW DXCC Credit Analyzer” for DXCC entity, band-slot and mode analysis. The analysis does not include deleted entities. Also, I could not completely automate the process because of the way LoTW displays the DXCC Award Credit Table (no option to download the table as a spreadsheet or CSV file). I included instructions in the app for creating a spreadsheet from LoTW’s DXCC Award Credit Table, which can then be loaded into the app. Feel free to give it a try!
I have been working a lot more SSB since I added the hexbeam and amplifier to the station. The majority of my confirmed DXCCs has been on digital modes FT8, and before that JT65), so I have been making more of an effort to confirm DXCCs on CW and phone. DXpeditions over the past few months have helped tremendously. I have reached 273 DXCCs on LoTW, so the going will be very tough from here. Hopefully I can continue to add to the CW and phone totals!
My preferred logging software is N3FJP’s Amateur Contact Log. It is easy to use, and integrates well with my IC-7610, and with WSJT-x/JTAlert. It can also automatically upload contacts to several online logging/QSL platforms (LoTW, QRZ, CLubLog, and eQSL). I have been very happy with this workflow, and it covers my logging and verification needs.
At the recommendation of a trusted friend, I decided to check out World Radio League (WRL). It is a cloud-based application that is sort of a mashup of a logbook and social networking for ham radio operators. The team that designed and built the application also created Ham Radio Prep, which is a web-based application that prepares hams for license exams.
WRL is available as a web application, as well as apps for Android and Apple phones and tablets. You can sign up for WRL for free, with limited features. There are also three paid levels (Basic, Premium, and VIP) that offer more features and capabilities. I chose the Premium level for $60/year.
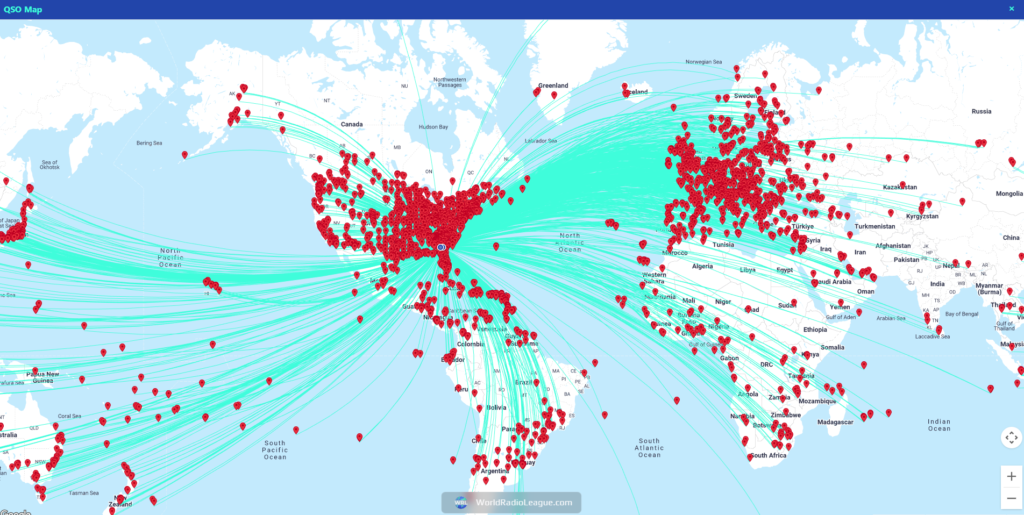
I have only started to explore the options in the WRL web application. I was able to create a profile with my station information, and uploaded an ADIF file (from ACLog) with all of my contacts. Those two processes went smoothly.
Here are a few screenshots showing some of the key pages and features in the WRL web app:
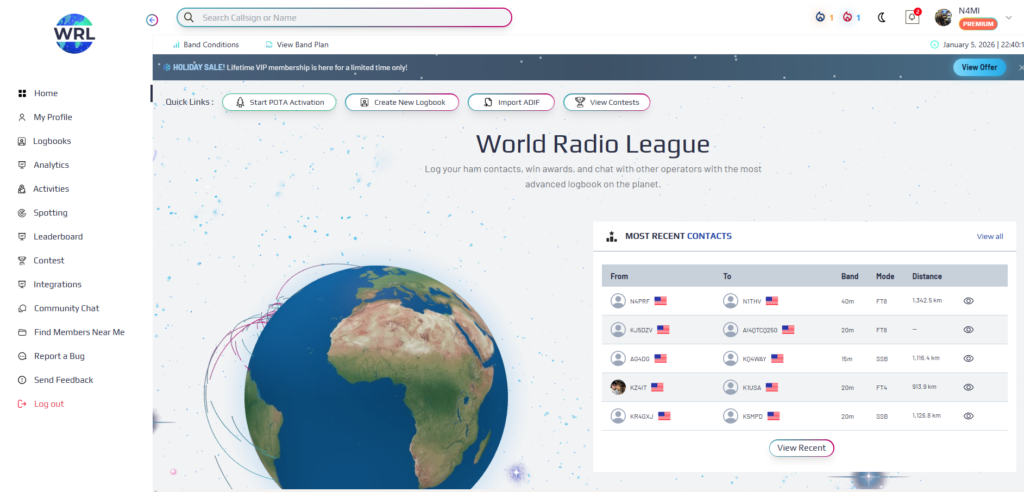
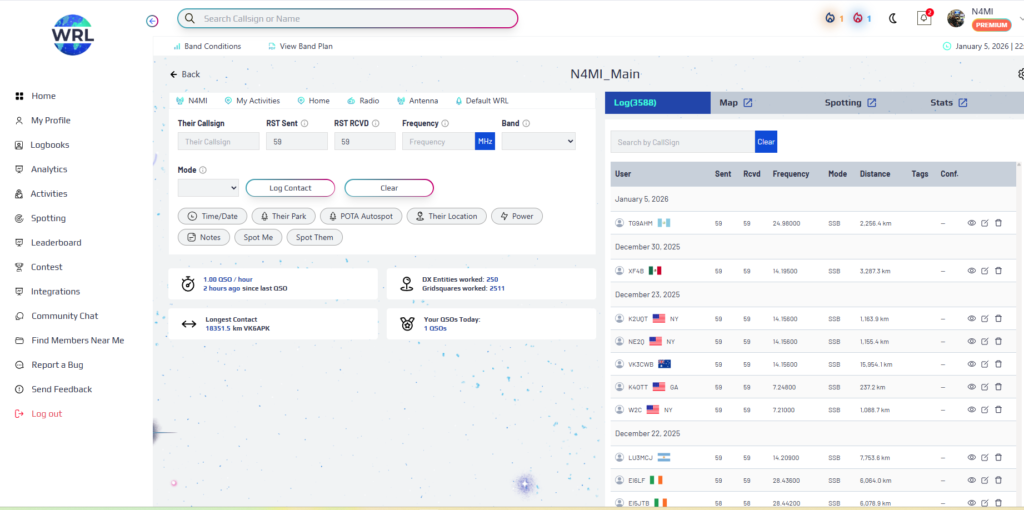
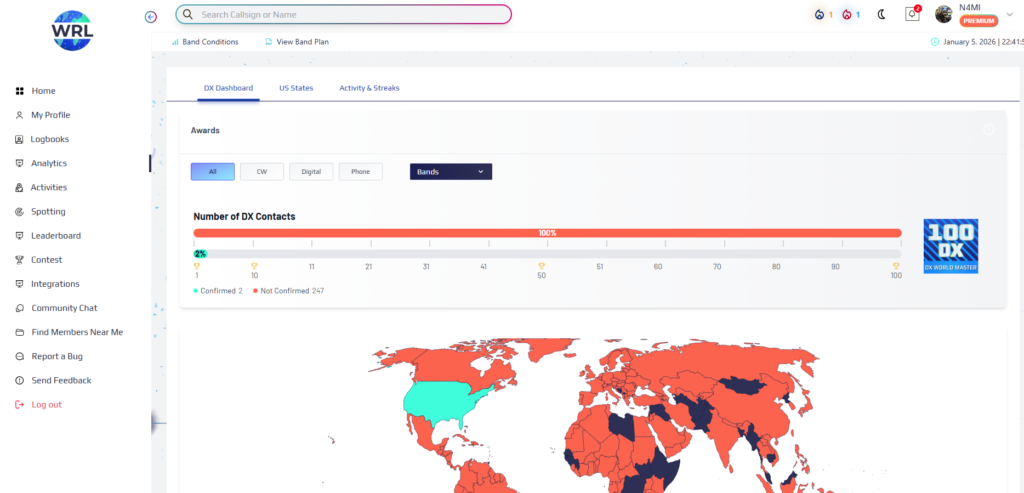
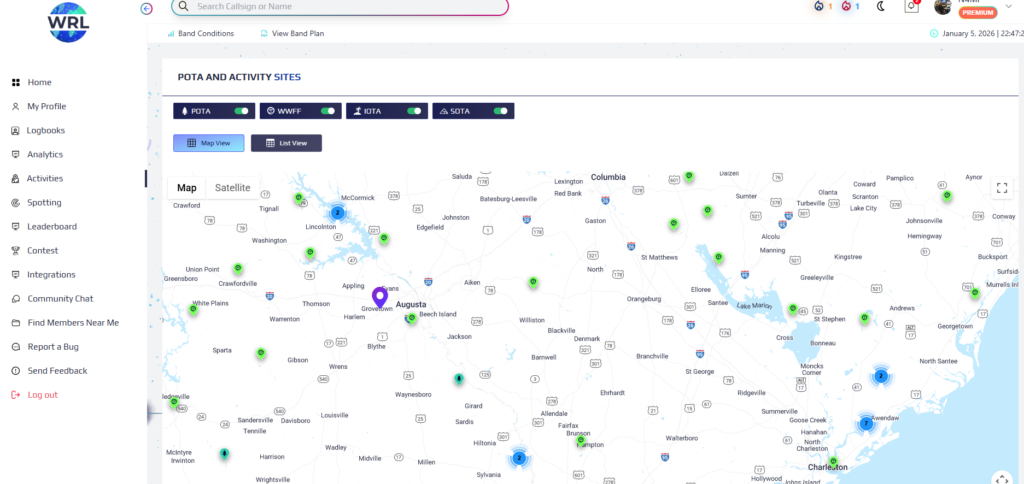
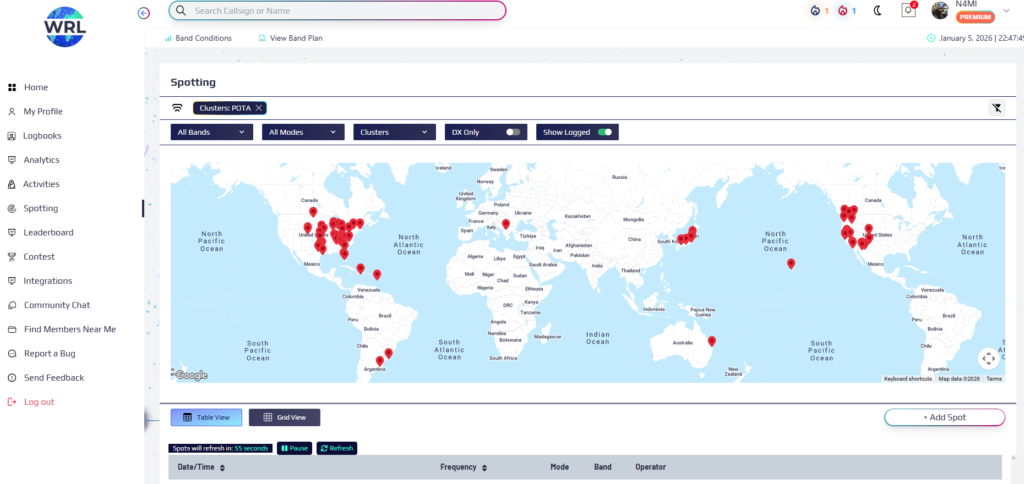
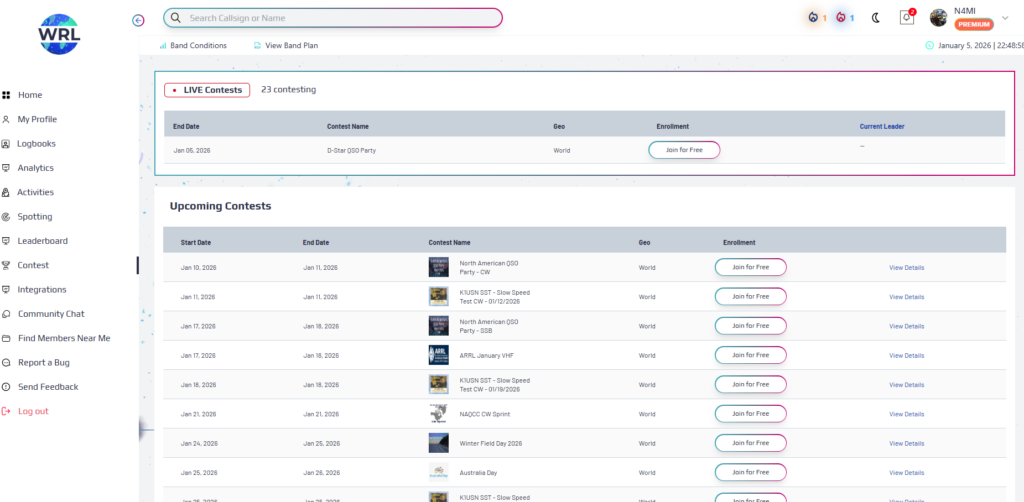
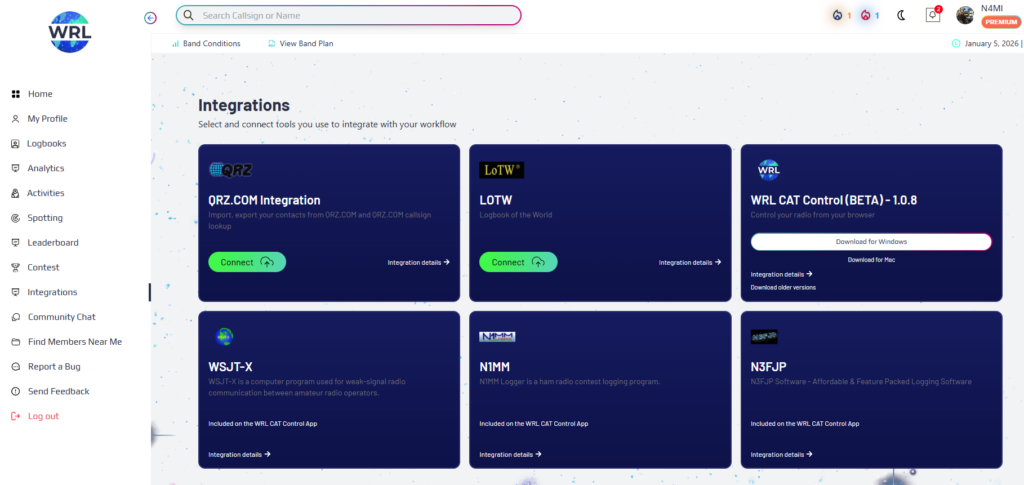
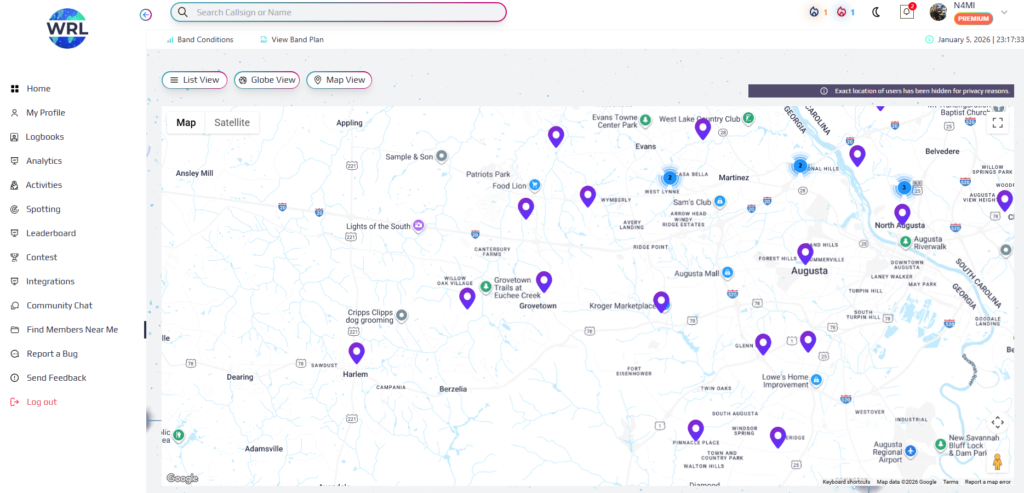
This is the home screen that is displayed after logging in to WRL.This is the logbook page in the web app.The logbook page includes a map depicting the logged contacts.The Analytics page displays all of the countries and states I have worked. It appears that the confirmations only include those from within WRL.The Activities page shows a map or list of POTA, SOTA, IOTA, and WWF sites.The Spotting page includes a very customizable map and list of live spots.The Contests page is very interesting. The app can create logbooks for various contests. The page shows current and upcoming contests, and allows you to “enroll” to create a logbook for the contest.The Integrations page is for setting up and configuring integration with QRZ.com and LoTW sites, WSJT-X, N1MM, and N3FJP.The Find Members Near Me page shows locations (not exact) of other WRL members.
Each of the pages on the web app have a multitude of configurations and display options. There are also several other functions that I haven’t explored yet. I also need to check out the app on my tablet and phone. Time will tell whether WRL will replace any of the other applications in my workflow, or supplement them. I’ll post an update after digging deeper into WRL.
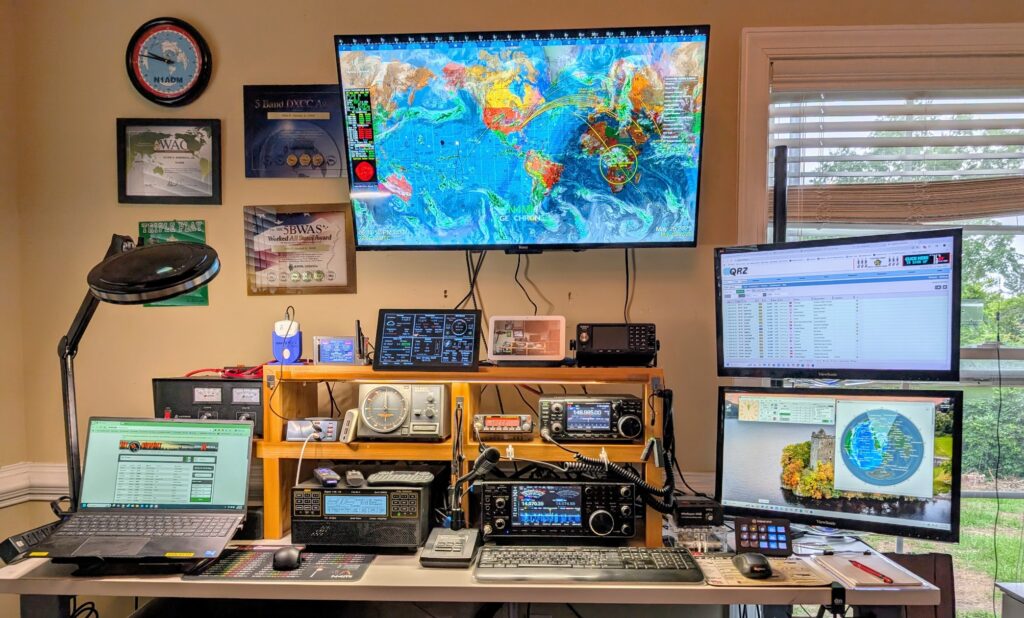
It has been a long journey, but I have finally completed all of the station updates that were started over a year ago. Several of my ham friends came over to pull coaxial cables through conduit, connect coax to the entry panel, and align the rotator. I had some additional work inside the shack to set up a new amplifier and computer. After double-checking every connection and configuration, everything is working great and I am very happy with my (mostly) new station!
Outside I have a U.S. Tower MA-40 tower with Yaesu G-800DXA rotator turning a K4KIO hexbeam antenna with elements for 20-6M. I also have a MyAntennas 80-10M end-fed halfwave antenna, and a discone antenna for my scanner. These are all fed through underground conduit to a KF7P entry panel with Morgan Systems lightning arrestors for the coaxial and rotator cables.
Inside the shack, my station consists of a Icom IC-7610 transceiver and SPE Expert 1.5K-FA Taurus amplifier for HF. For CW, I use a UR5CDX paddle with a WinKeyer USB and MRP40 decoder software. For digital, I primarily use WSJT-X, but sometimes dabble in RTTY and other digital modes. I have a ERC Mini DX as a USB interface with the Yaesu control box, along with PstRotatorAZ software.
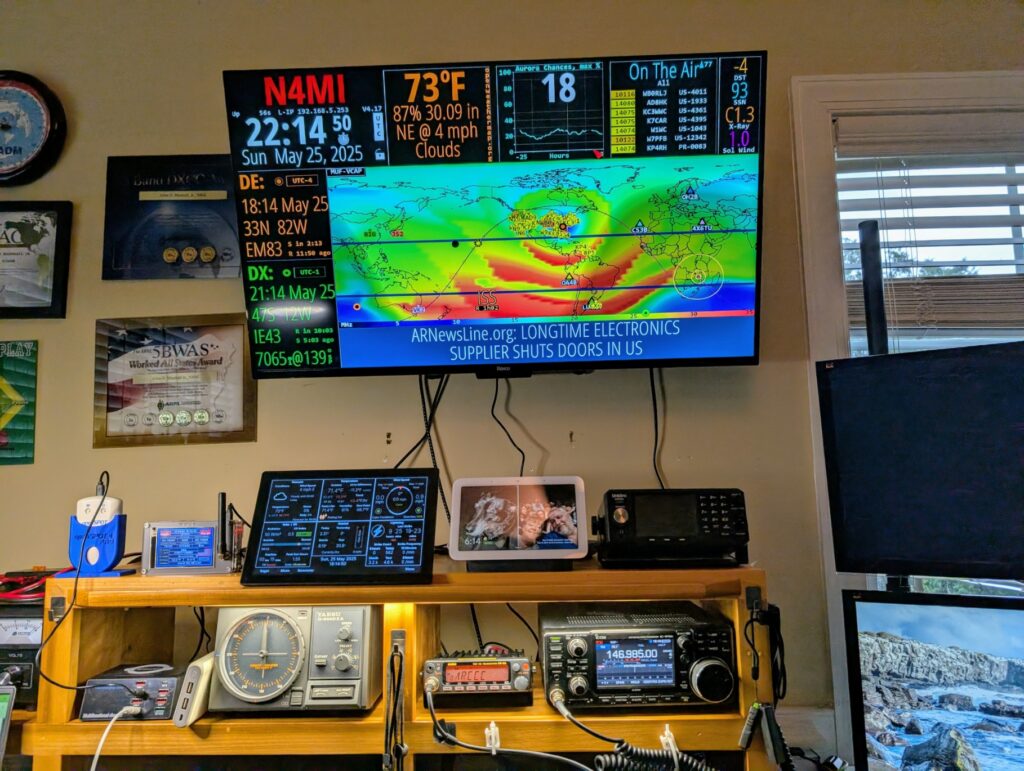
For VHF and UHF I have an Icom IC-97oo, as well as an Alinco DR-06TA for use on the local 6M repeater. I use a Uniden SDS-200 scanner to monitor various communication in the local area.
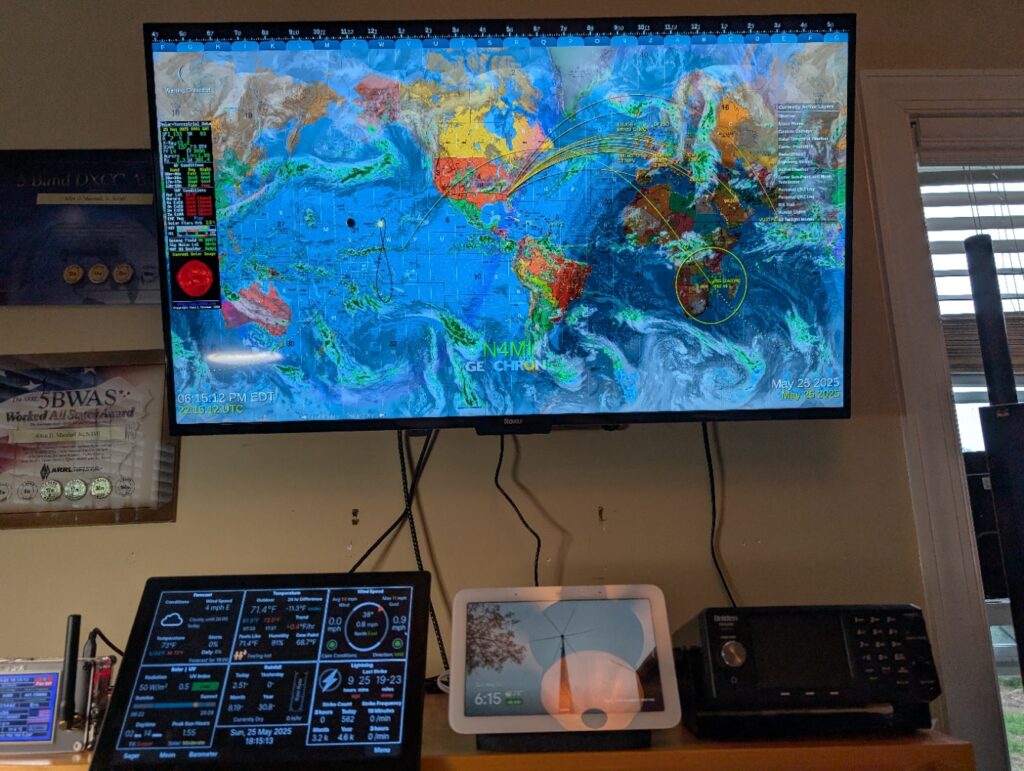
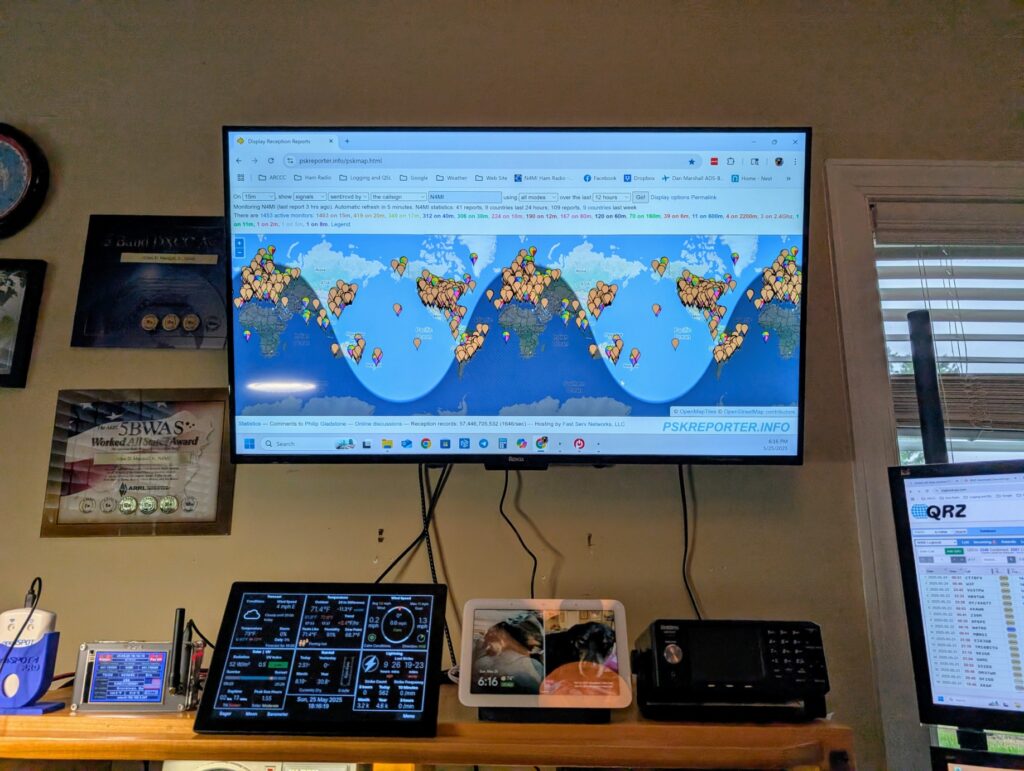
I also updated the TV I had over my station with a 43″ 4K Smart TV. It has 4 HDMI inputs so I can switch between displaying GeoChron and HamClock, or as a third monitor for the computer. I upgraded my trusty Windows 10 shack computer with a new Windows 11 computer. I have Raspberry Pi touchscreen display running WeatherFlow PiConsole software to display weather data from a WeatherFlow Tempest station. I have two MMDVMs, an OpenSpot 4 Pro and a TGIFSPOT 3.5 inch Nextion. Finally, there is a Google Nest Hub that I use as a photo frame and for streaming music and monitoring security cameras.
I’m working on some significant upgrades to my ham radio station. I finally received a Mercury IIIs amplifier. I was on the waiting list for about a year. I also got a Palstar HF Auto tuner to handle the increased power from the amp. For outside the shack I also got a K4KIO Hexbeam antenna. The only problem is that I don’t have a tower for it yet. That will be next, and hopefully soon! I’ll make additional posts as I bring the new equipment online.
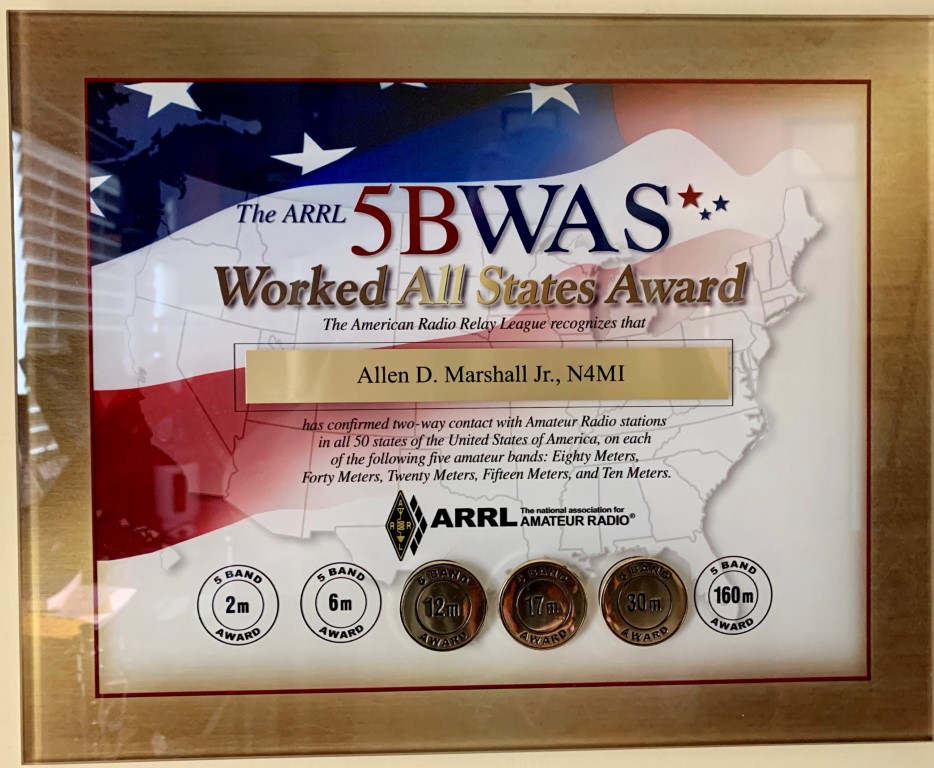
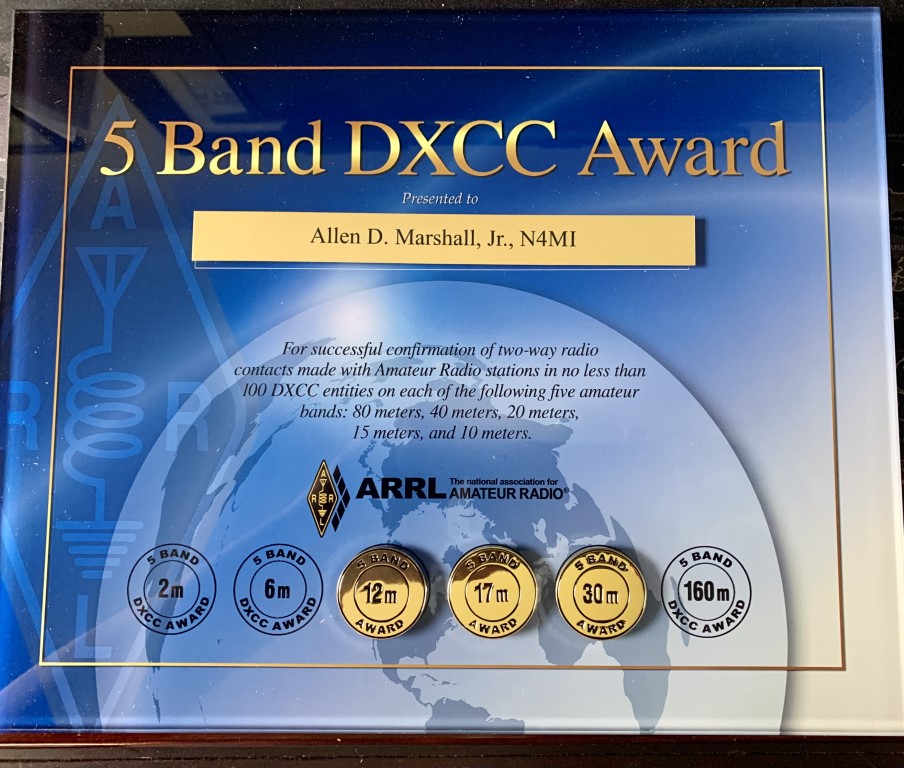
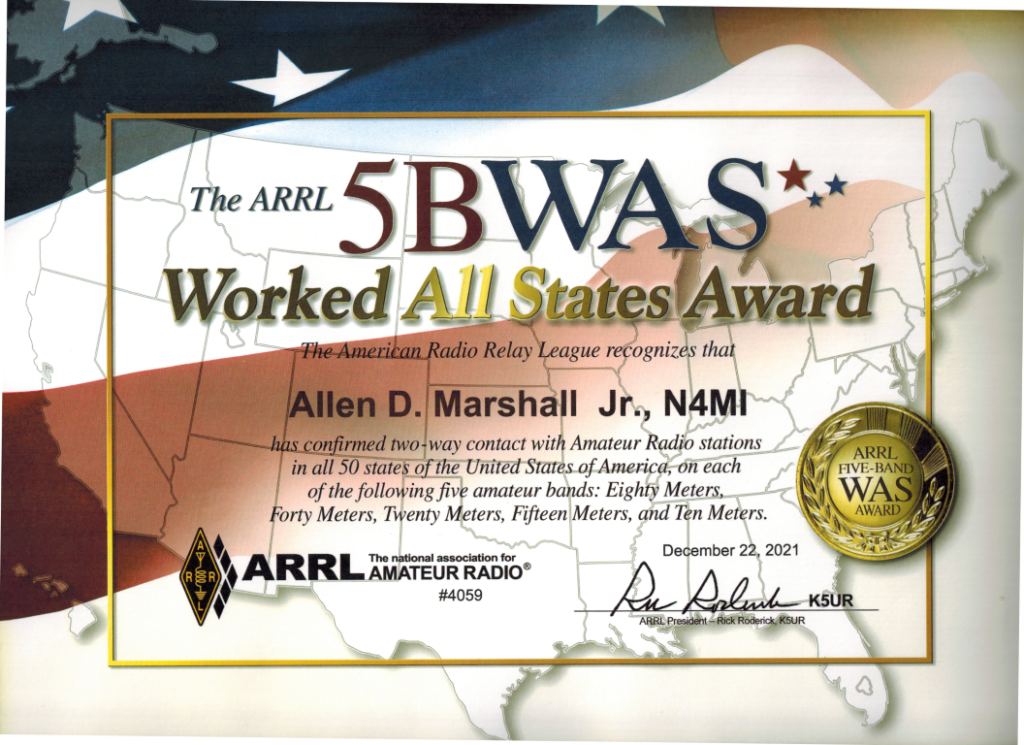
Ever since I got my ham radio license, just over 6 years ago, I have been interesting in DXing, contesting, and awards. I started out at the bottom of a solar cycle, which helped me learn how to make contacts under less than ideal conditions. I’m not as much into the competition with other hams, but it’s satisfying to set and achieve my own personal goals. Now that band conditions are starting to become more favorable, I was recently able to achieve two longtime goals, which are the 5 Band Works All States (WAS) and 5 Band DXCC awards.
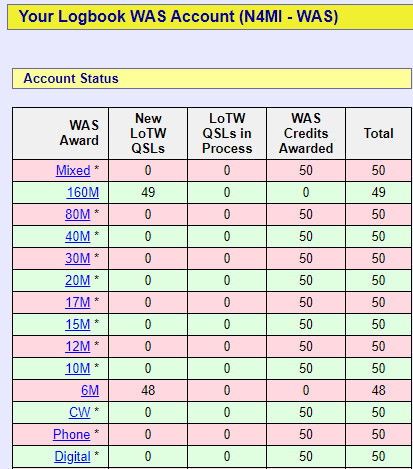
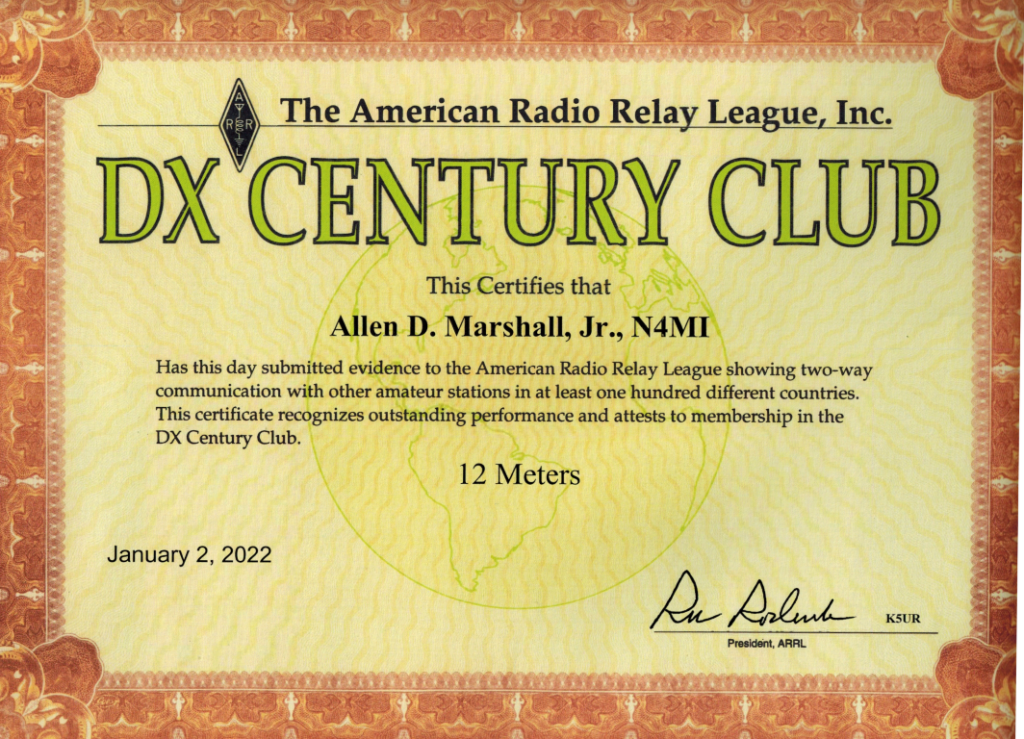
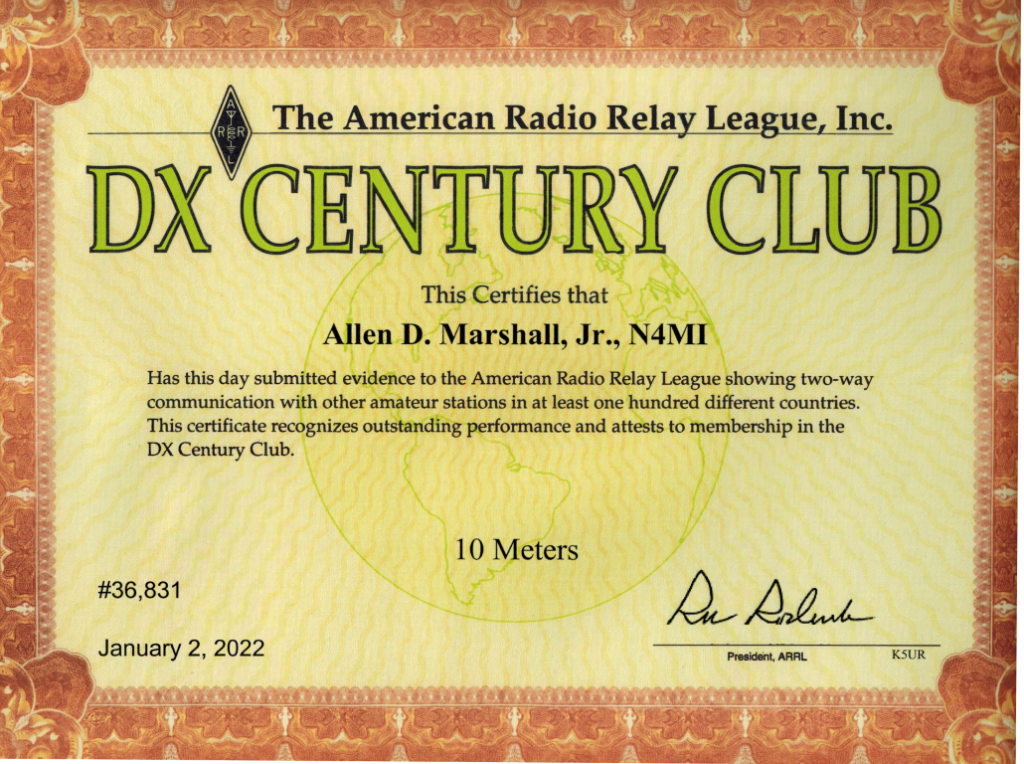
The last band I needed for both WAS and DXCC was 10 meters. The band conditions improved enough over the past few months to make that possible. I was also able to add endorsements for 30 meters, 17 meters and 12 meters. I still need Alaska and Hawaii for WAS on 6 meters, and Hawaii for WAS on 160 meters. Maybe someday!
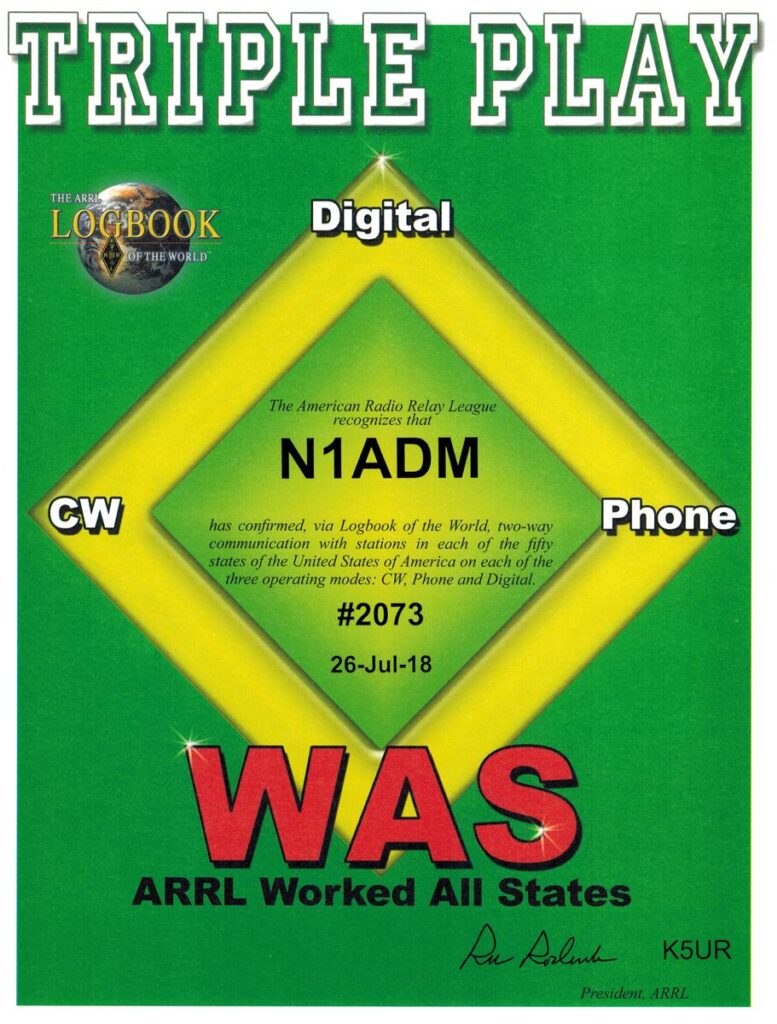
I was able to complete the Triple Play WAS award a few years ago.
Last month, I was given the opportunity to participate in a 30-day test and review of the Bilal Isotron 40M antenna for the 100 Watts and a Wire podcast. The Isotron is a strange looking and compact antenna that has reviews with an overall rating of 4 stars on eham.net. After building and then testing the antenna for a month, I was invited to participate in the podcast along with two other hams to give our review of the antenna for the following criteria:
You can listen to the podcast here. In addition to the audio podcast, there are videos covering each of the review criteria on the 100 Watts and a Wire YouTube channel. (Each of the criteria listed above includes a link to the YouTube video for that topic.)
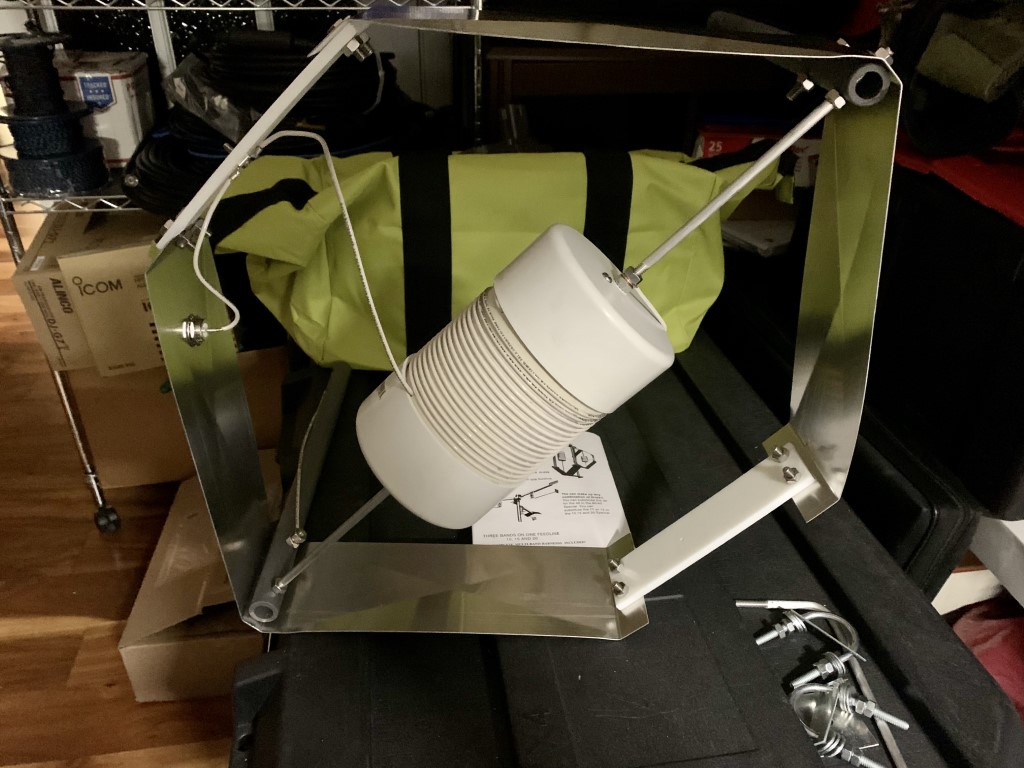
Assembling the Antenna
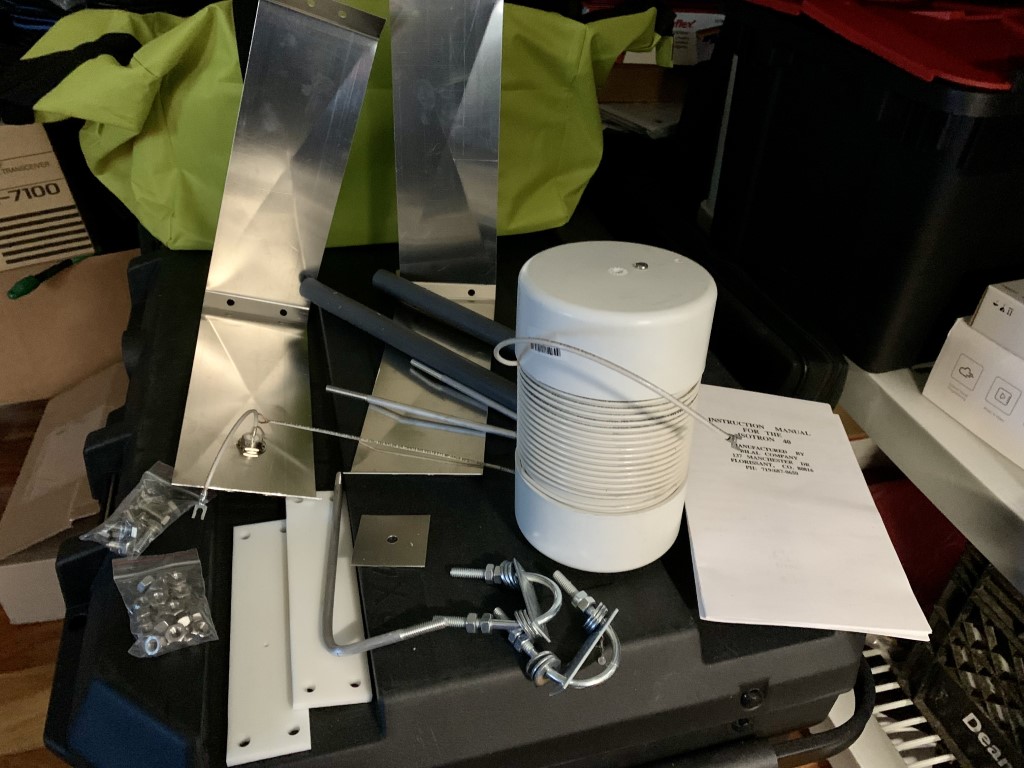
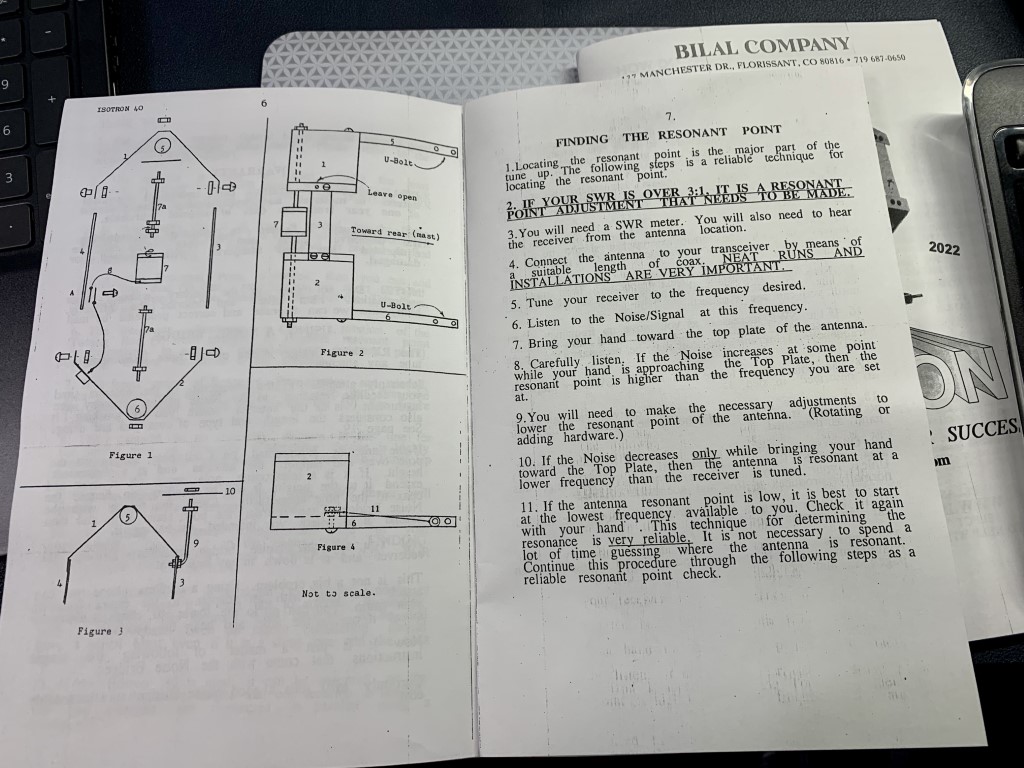
The antenna arrived in a sturdy box, and all of the parts were in good shape. The paper manual is adequate and includes diagrams that were helpful for assembly. It took me about an hour to put it together. Once assembled and tightened, it is a sturdy antenna. It’s worth reading the manual closely before attempting assembly, and again afterwards to understand the instructions for tuning the SWR.
Photo of all parts prior to assembling the antennaThe manual is not fancy, but includes good instructions to assemble the antenna. Pay close attention to the instructions for tuning the antenna.The antenna is almost fully assembled, with the U-bolts for the mast and tuning arm still to be installed.
Installing and Testing the Antenna
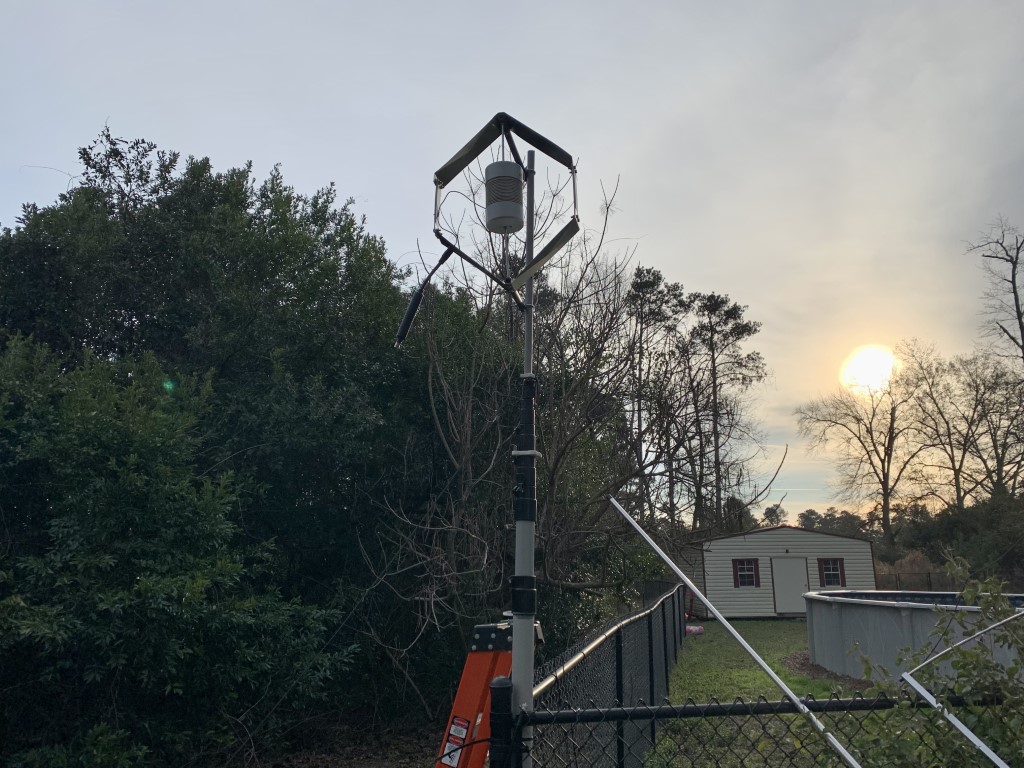
I installed the antenna on 28-foot heavy duty fiberglass telescoping mast from Max Gain Systems. The mast is located next to a long chain link fence, which may have interacted with the antenna and made tuning it a bit challenging initially. Once attached to the mast, I used a Comet antenna analyzer, and attempted to tune the antenna for the lower end of 40 meters for CW and digital modes. For my first test, with the antenna mast lowered, the SWR was just above 3:1. I believe that was partially due to close proximity of the metal fence. Also, the manual specifies that the antenna works best with a metal mast, likely to serve as a counterpoise. I attached about 25 feet of copper wire to the antenna ground as a counterpoise, and made some more tuning adjustments. After that, and when I raised the antenna to 25 feet, the SWR was down to 1.6:1. Close enough, since I have an antenna tuner in the shack.
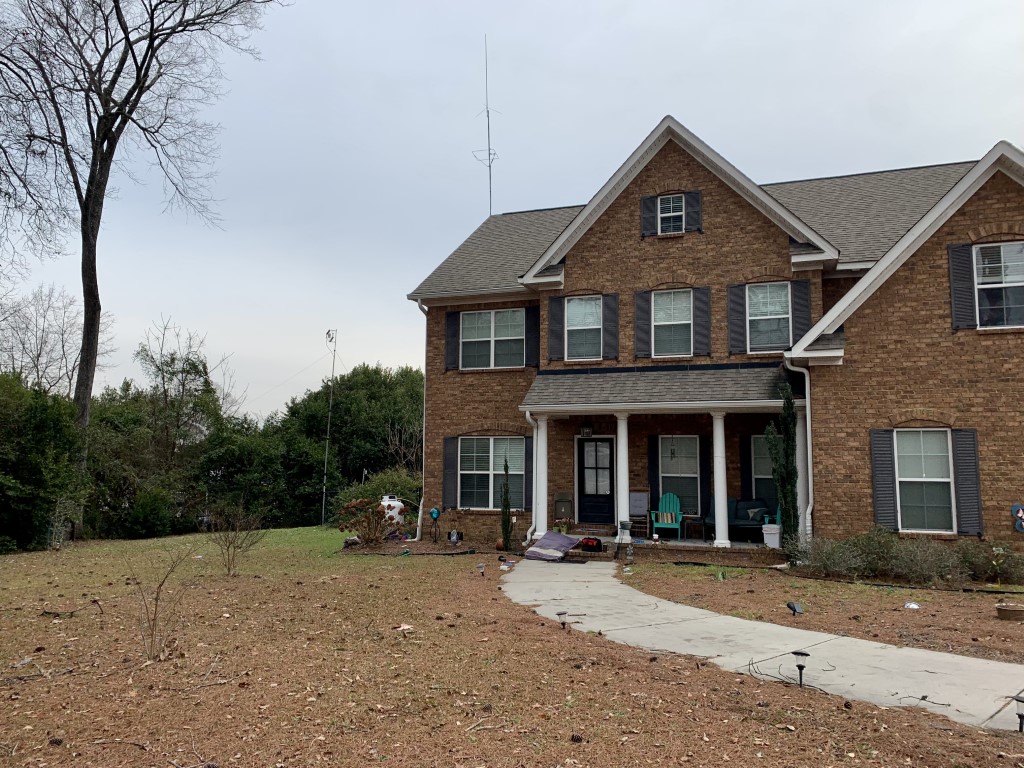
I mounted the antenna on a HD fiberglass telescoping mast. The mast was lowered to mount and tune the antenna. This picture shows a HF choke at the feed point, which I ended up removing after testing.The mast extended with the antenna about 25 feet off the ground.From a distance, the antenna is not quite as noticeable as the roof-mounted VHF/UHF vertical and 6M horizontal loop antennas.
Performance
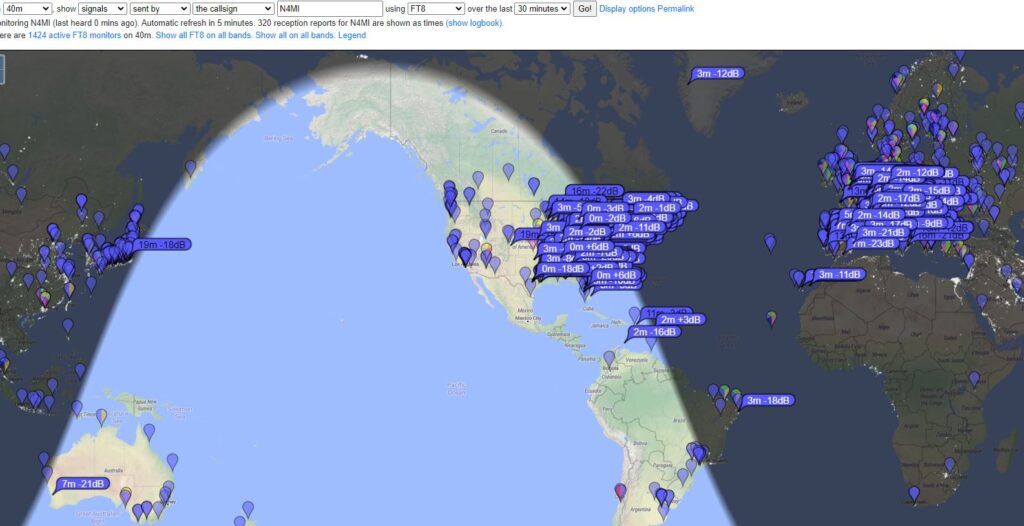
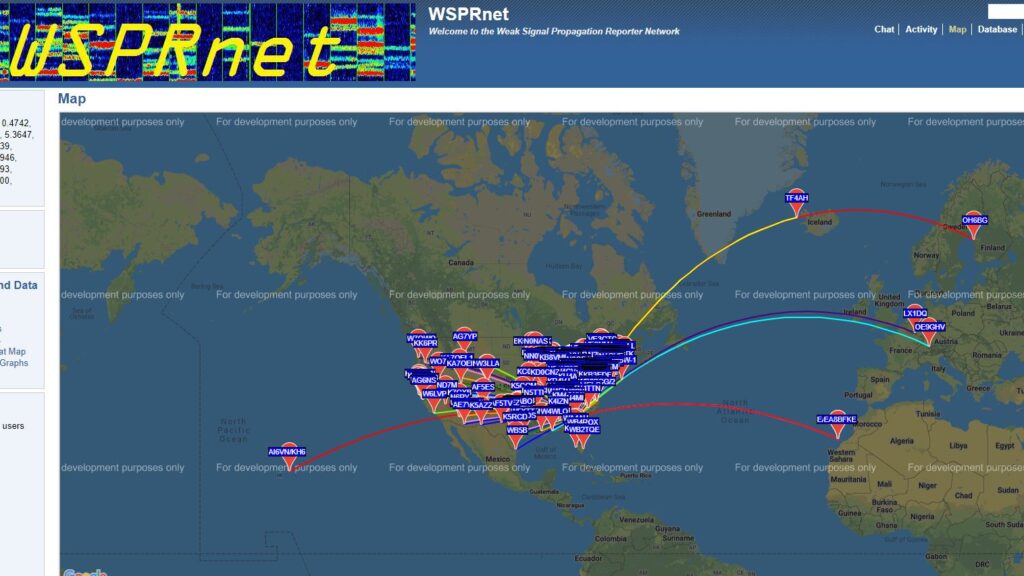
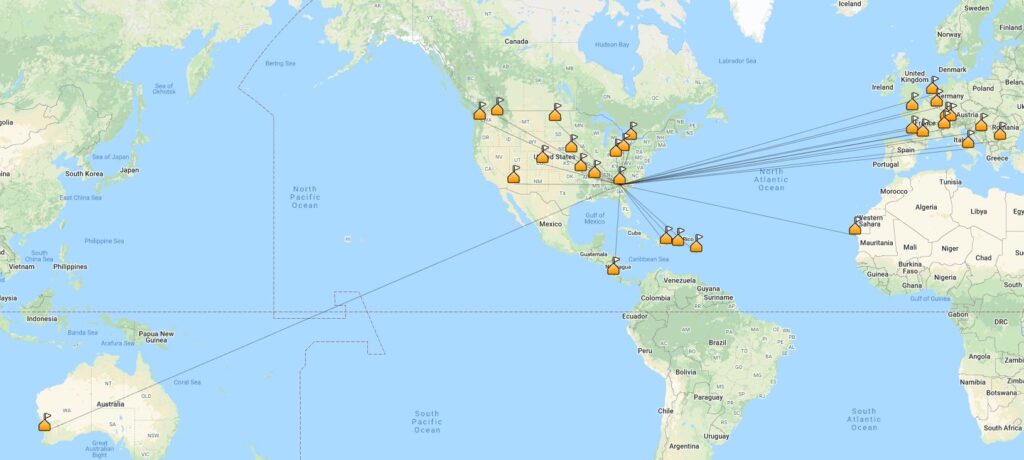
I tested the antenna for 30 days using FT8, WSPR, CW and SSB. The first contact I made on FT8 was in Washington State… a very promising start! Using FT8, I was easily able to work stations all over North America, as well as some DX stations in Europe, Australia and Japan. I also tested the antenna using WSPR for 24 hours, and my signals were received across North America and in Europe. I used the antenna for all of my 40 meter phone and CW contacts during Winter Field Day, and I was able to make a lot of contacts across the U.S. and Canada. The antenna performs better than I expected it would. However, it is not a good for receiving when compared against my end-fed halfwave antenna. I made comparisons several days, and the wire antenna was always noticeably better for receiving.
Stations receiving FT8 signals from Isotron 40M antenna on January 19th, 202224 hour WSPR test with Isotron 40M antennaCompleted QSOs made with the Isotron 40M antenna as of January 20th, 2022
Final Thoughts
Pros: 1. It actually works! When I first looked at the antenna, I was skeptical. After testing it for 30 days, I realize there are some use cases where this antenna is a good choice. 2. This antenna would probably good for someone with HOA restrictions, as it is small enough to be hidden. However, keep in mind that my testing was with the antenna mounted at 25 feet and in the clear. 3. Because the antenna is compact and can be raised quickly, it would also be a good choice for portable operations or emergency communications. Cons: 1. The antenna is only for the 40 meter band. If you have space for several antennas, that’s probably not an issue. 2. The antenna can be somewhat finicky with SWR. It made several trips up and down a ladder, and lowered the mast a few times, to get it adjusted. I also had to retune the antenna after one particularly cold, windy, rainy day.
The antenna retails for $160. Would I have bought this antenna on my own? Probably not. During the podcast, each reviewer was asked to give a “signal report” between 55 and 59 as an overall rating of the antenna. My report was solidly in the middle with a 57. It is definitely strange looking, but the appearance and compact size belie an antenna that actually performs fairly well, as long as you don’t expect miracles. I will most likely take the antenna down from the mast to install an off-center-fed dipole, and see if one of my ham friends living in a HOA community would like to give the Isotron a try.
This was a great ham radio experience for me. I had a lot of fun building, testing and using the antenna. I also enjoyed being included on the 100 Watts and a Wire podcast, and Christian Cudnick, K0STH, is a great host.
The conditions on 10 meters have finally become favorable for me to get enough confirmations to complete WAS and DXCC on that band, and those were also what I needed to complete 5BWAS and 5BDXCC. I received the 5BWAS certificate, and applied for the 5BDXCC certificate. I also have WAS and DXCC on 30M, 17M and 12M. All of these were completed using 100 watts and omnidirectional antennas. The key has been persistence, and some luck to be on the radio when the bands are open.